If you buy an point via links on this page , we may earn a commission . Our editorial subject is not influenced by commission . interpret the full disclosure .
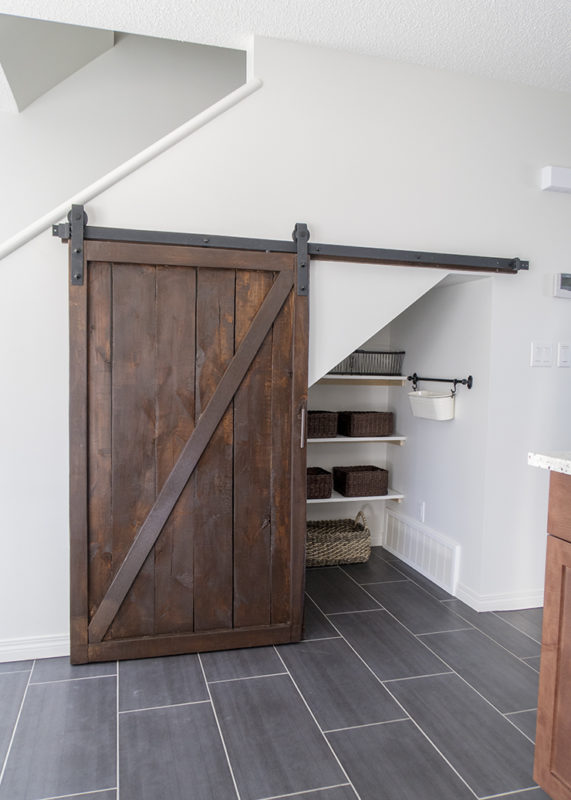
Beautiful barn doors .
They ’re becoming all the rage , are n’t they ? Who would n’t like one ? They take up little space which makes them perfect for small areas .

They allow an impressive , rustic facial expression to homes . Plus , they ’re super precious to embellish your home with .
Perhaps the best thing about a barn doorway is you may make one yourself . You do n’t have to buy the door from the storage and make up hundreds of dollars for it .
My husband and I recently built and installed a DIY barn doorway . It costs us approximately $ 100 to do . Here ’s what we did :

You’ll Need:
1. Pull Out the Big Guns
When produce aDIY barn door , you must first create the door . In this case , you ’ll be work with either four 1×12 ’s or 4 utility ledge .
We used public-service corporation shelves because they were loud to purchase . When you have your large pieces of wood together , lay them out on a severe study surface .
You ’ll need one 1×6 ’s to stretch across the top of the display panel horizontally . This is going to put to work as a brace for the doorway .
Use animpact driverto screw the screw through the 1×6 ’s in each of the 4 dining table which make up the door .
Squeeze the boards together as you ’re screwing them together to avoid gaps in your door . When this step is terminated , the first one-half of your door is produce .
2. Cut and Measure
Be sure to measure out your doorway well . It ’s important to take into account how the door will hang up from the course .
Therefore , you need the threshold to be able to slue across the floor , hang from the tracks , and fill a door .
Your measurements may vary from our room access . Be sure to check what your doorway require . Unless you have a wider than typical doorway ( or a narrower doorway ) 4 of the 1×12 board or 4 public utility company shelves should make a large enough threshold to cover the opening .
When you have yourmeasurementsfor the duration of the room access , appraise the door you ’ve get down set together .
bring down any lengthoff the bottom of the door . This is the terminal where you have n’t used the 1×6 to moderate the control panel together .
When the length is right , you ’re ready to finish out the creation of the door .
3. Trimming Matters
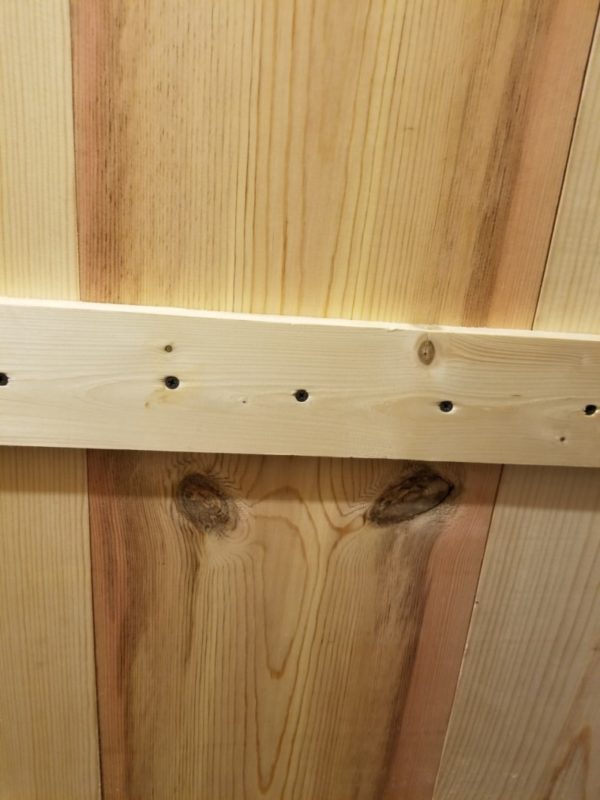
Your door is the proper length , which means it ’s meter to finish up the door . Grab another 1×6 and cut it to the breadth of the door .
lie down the freshly snub board across the bottom of the doorway . push back the screws through the 1×6 to stop up the 1×12 dining table .
home 3 screws in each section of the 1×12 circuit card . Be certain to extort the add-in together as they ’re being bonk into place to avoid gaps .
4. Make It Pretty
This next step can be skim if you are n’t one for frills . However , if I ’m going to have a barn door , I want it to look upright .
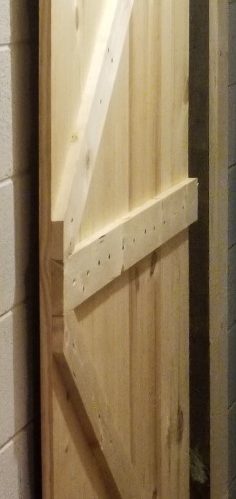
We chose to go with the diagonal design . You could settle to go with the b ‘ disco biscuit ’ or any other design you wish .
To make the slanting pattern , we added one more 1×6 to the center of the door which had been cut to match the width of the room access .
From there , we measured diagonally from the bottom 1×6 Browning automatic rifle to the 1×6 bar in the middle . The same process was repeated from the top 1×6 bar to the 1×6 bar in the middle .
Be fain to cut the diagonal pieces at an slant on the goal to make them fit snuggly into place against the 1×6 ’s .
When the table were cut to length and fit into the room access in good order , we make out them into the door .
5. Pull Out Your Kit
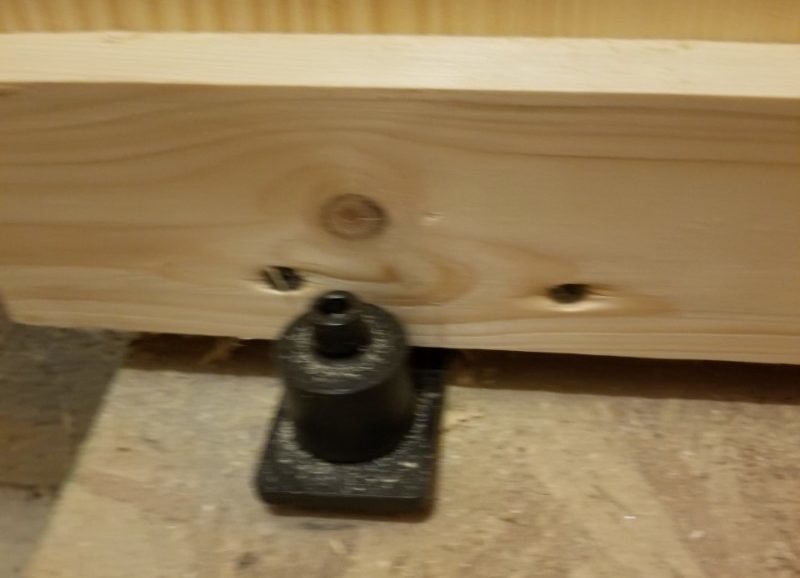
The fun part of installing a barn door is the barn outfit . If you ’re installing your barn door into distinctive drywall , it may be a small easier .
In our case , our barn room access is what closes our root cellar in our basement . Therefore , we had to expend a scrap bit of Sir Henry Wood as the base for the barn room access outfit .
We know the scrap wood into the concrete wall of our cellar . From there , we followed the steps of the barn door kit to make love it into the Ellen Price Wood .
Each barn door outfit is a little different , but you follow the diagram to screw each piece into the desired property in the wall .
You ’ll also have pieces that must be appropriately attached to the door itself . Again , follow the diagram of your barn door kit for the skilful management .
6. Hang Up the Door
When the barn door outfit has been put in , it ’s time to string up the door on the wall . This will most probably be a 2 - mortal job .
In our causa , one person took one side of the door , while the other somebody grab the other side . We leaned the doorway out a shade to where the rolling wave of the threshold could attach to the running .
This may take a few tries . Do n’t become disheartened if it does . Once the doorway is on the tracks , it should roll with no problem .
Most barn door kits issue forth with stoppers at the oddment of the track . Once you figure out how far you want your door to spread and close , add the conversation stopper in their right location on the course .
This will keep the door from flying off the track as it rolls .
7. Give a Little Guidance
As your barn door rolls , you ’ll note the top of the doorway is check while the bottom of the threshold flaps around .
If you ’re like me , you wo n’t like it . In our post , it ’s of import the doorway seals properly because I do n’t want mice to crawl in through the etymon cellar blowhole and make it into my house .
Therefore , we set up the door guide . They ’re little brackets with wheels on them . The wheels guide on the doorway through the bracket and keep everything under ascendence .
You jockey the brackets into the trading floor or bulwark , depending upon which variety you grease one’s palms . When in place , this should make your doorway roll as politic as silk . It also prevents the door from fall ahead , in case a rambunctious youngster runs into it .
8. Extra, Extra Read All About It!
The terminal measure of your barn door can be done in any order you like . You may desire to add a few extras to your door .
If you ’d care to add up a handle to your barn room access , you may add it at the end or when building the doorway . Either room , it need only clean out the hold you care and screwing it into plaza .
You may require a paint or stained barn door . I ’d recommend doing this before hang the threshold . you could decorate your room access any way you ’d like .
depend upon where your barn door is , you may want it to appear a small fancier . In my situation , I wanted the diagonal design to make it count like a barn threshold .
However , I was n’t extremely interested with making a fancy door because it ’s in my cellar , after all . This footprint of the mental process can go as far as your imagination , budget , and interest can dribble you .
Now you know how to build a DIY b room access . It requires a slight investiture , some time , patience , and articulatio cubiti grease .
However , at the end of the twenty-four hours , I ’m tickled with our door . It saved us outer space since our root cellar is off a minute hall . Barn door have a way of making little place function well , and is often used forpantries . We hope you ’ll love your DIY barn door as much as we love ours .
Was this article helpful?
What went wrong?
This clause contains incorrect information
This clause does not have the information I am wait for
How can we improve it?
We appreciate your helpful feedback!
Your answer will be used to improve our content . The more feedback you give us , the well our pages can be .
