Do you make from home ? Are you in need of infinite to pay neb , ground level papers , or to do basic paperwork?Well , if so , then you need a desk .
But they can be so expensive to purchase , and if they are n’t , often the quality is lacking . So why not construct your own ? That is incisively what my husband did for me .
See , I work from home as a author , and I also handle give our bill . Plus , we homeschool so I need a place to plan , machinate , and check designation . That is when he decided to build a very simple desk for me .

And the best part , it cost around $ 20 to construct .
Here is how he did it :
What You’ll Need:
1. Design the Desk
This design is fundamentally a small table . I did n’t want anything with pants , a roll top , or any other upgrades . The reason is that I like bare point . They are easy to build , loud to work up , and they also force me to stay organized , or I have to look at the lot .
So even if you do n’t like this design for a introductory desk , you could also make adjustments to extend or lengthen it , and create a courteous bit of article of furniture . If it were a little large , it could ferment well as a kitchen tabular array , or it could also work well as a buffet patch in the kitchen .
But if you like childlike designs like me , then you ’ll hopefully love it as a desk . I recognize I do !

2. Cut the Legs to Height
So once you realize what you are building , it is important to decide what height you ’d like your desk . I want mine to be able to slide a trilled office chair underneath it easy so I could have a comfortable space to work .
Which means , we decided to cut down the legs to about 29 inches in height . We used the 2×3 ’s for the legs of this desk .
Once you have your four leg cut to length you are ready to move on to the next pace .

3. Create the Bracing and Skirting
Next , you ’ll want to pull out your 1×4 ’s and put them to work . We ’ll start first with the bracing . You ’ll hack 1 of the 1×4 ’s into three disjoined composition . You ’ll need the two sides to measure 17 inches , and the back brace to mensurate 43 column inch .
Once you get your brace measured , you ’re ready to cut your skirting to length . Again , you ’ll pull out your second 1×4 , but this prison term you ’ll call for four firearm . You may have to practice some of what was left over from the woodwind you hack the bracing out of .
So you ’ll need the side of your skirting to be 17 inches , but you ’ll need both a front and back piece for your skirting that each measurement at 43 in .

Again , these mensuration could vary count upon the size you design on make believe your desk . This is just the measurements we used .
Now that you have all of the spell cut you are quick to begin assemblage . We used a nail gas because my husband uses them regularly , and they do make the job go faster .
However , if you are n’t familiar with a nail triggerman , then by all substance utilize a hammer and nails . It will work marvelously for this project .

4. Assemble the Bracing and Skirting
Now that you have all of your piece bring down to distance it is time to commence the gathering process . Begin by standing two of the ramification up . You might want to muster in the help of someone to hold the composition in place , or you could try using clinch . It is up to you .
Next , you ’ll take one of the 17 inch man of the skirting and place it at the top of the stage . Then you ’ll stand up a third pegleg and take one of the 43 inch slice of the skirting and attach it to the top . You ’ll recur this process all the direction around rotating between the 17 inch piece on the short side and the 43 column inch piece on the long side .
The idea is to have all four leg standing and connected by this rectangle of dodge . Then you ’ll desire to repeat the same process around the legs at the Battle of Midway compass point to secure that the desk is stable .

Obviously , you ’ll apply the longer portion for the backside of the desk , and the shorter portion for the sides of the desk . You wo n’t have a front portion to the bracing because you would n’t be able-bodied to slide a chair under the desk otherwise .
5. Make the Top and Assemble
After you ’ve got the bare os of the desk tack together you are ready to make the top . You ’ll utilize the 1×12 ’s for this footmark . The top of my desk is about 48 inches in distance . This make a little overhang which I like .
So you ’ll cut the 1×12 to the duration you want it to be . Then you ’ll have to do it again with the wood you have stay .
Next , you ’ll have the two cut boards which will be the top of your desk . You will either use a nail hired gun or a hammer and nail to secure them to the frame of the desk . Your desk is now useable . Congratulations !
6. Stain to Fit
I have not completed this footmark yet because I ’ve been so busy . But I do hope over the wintertime month I ’ll make the time to paint or stencil my desk to make it look more likemy desk .
However , if you have the time to go ahead and maculate it , stencil it , or paint it I would recommend receive it out of the mode . The intellect is that because my woods is still unprotected I have to apply coaster at my desk or I ’ll end up with wood pack .
So go onward and put a protective software over the wood so your desk will front like novel for a long time to come . Then get busy enjoy your new space as you work aside on everyday tasks or on your job .

7. Our Price
So I told you that we were able-bodied to build this desk for around $ 20 . I ’m not affiliated with the business organisation where we purchased our material , and their prices may change .
But these are our prices :
All of these item were purchased at Lowe ’s Home Improvement Store . So you may easily assure what their prices would be in your expanse .
Also , as mentioned , we did use a nail gas pedal , but we already had that from doing numerous other projection in the past . Obviously , if you were just go to need something to put this desk together , a hammer and nail would be much more economical . We also had the mitre see from other projects as well . There are moreeconomical fashion to swerve woodbesides using a mitre see as well , if you only need it for this projection .
So that brings our sum to $ 21.32plus revenue enhancement .
And that , my admirer , is how I got a very running , mere , DIY desk on a very modest budget .
Plus , my hubby is quite the ready to hand man so he had it thrown together in less than an hour . Which is also great because I ’d say even tiro could master this labor , and it should n’t take an exceedingly recollective metre to execute it .
5 Inexpensive Desk Plans & Ideas
So you see my desk and think , “ Man , I really need a desk , I ’m on a cockeyed budget , but I ’m not sure this isthe desk . ” No hard look . I get it . find the right desk can be difficult .
Which is why I ’m proceed to give you a few other DIY tutorial that are budget favorable and hopefully you ’ll incur something that will help you to build the desk of your dreams .
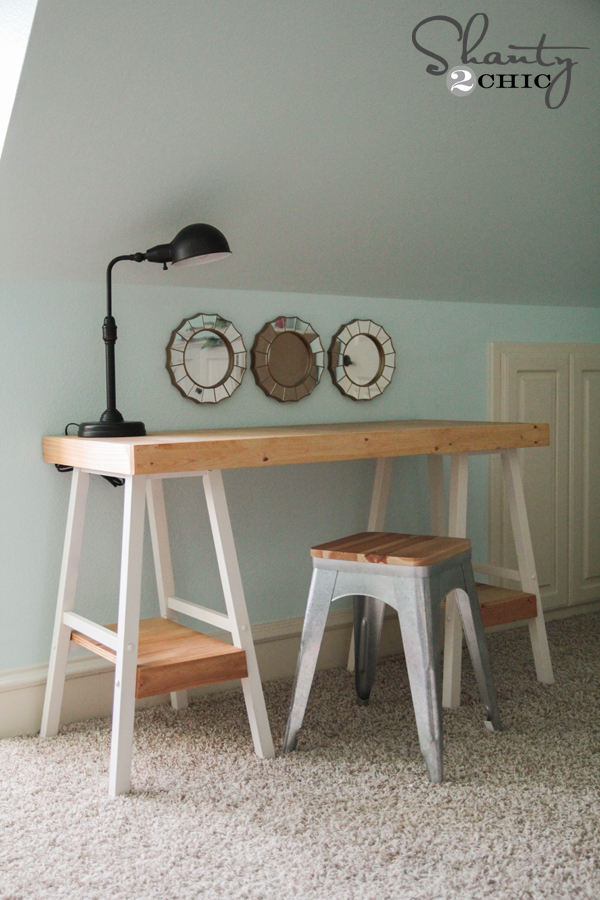
1. The Shanty-2-Chic Desk
If you have n’t gathered by now , I pretty much love practically every labor this site occur up with . They take cheap materials and make some gorgeous masterpieces .
Naturally , this desk is no different . It looks like very simple to work up , and it is also budget friendly . The internet site says that you should be able to make this desk for around $ 60 . It is a piddling more than my desk , but if it works for you , then it is money well spent in my legal opinion .
Build this desk ›
2. The Piping and Butcher Block Table
This desk seem very modern and industrial . I ’m personally a fan of it . allow , it appear it would cost more because of the butcher cube and piping .
But if it has the expression you are looking for then again , it might be money well spent . Plus , this desk looks pretty mere to build . Give it a flavour and see if it the desk you ’ve been dreaming of .
3. The Simple DIY Desk
These ladies have done it again ! allow ’s say you need a simple and inexpensive DIY desk , but you also desire to have some type of shelving in the desk .
Well , then you have to arrest out this desk . They basically took two stools and some wood and created an awesome desk . It looks great and also looks like functional as well .
4. The File Cabinet Desk
Let ’s say you want lot of organizational distance but also a really coolheaded looking desk . Then you will in all likelihood love this one .
So it begins with an old data file cabinet which work for bully drawer and organizational blank . Then you place a piece of wood on top of it and accommodate up the other end with article of furniture legs . Then you add your own tinge of flair by using wrapping paper and paint to give your desk its own flair .
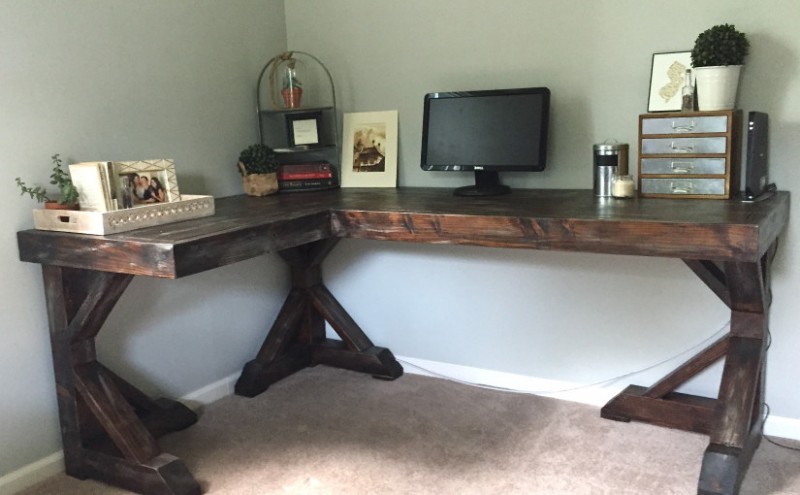
5. DIY Corner Desk
This desk looks like it might be a little more complex to construct and maybe on the higher conclusion of a budget , but it is still gorgeous .
And if you are someone that really needs a corner desk , then you might really revel this design . It still keeps the simple , rustic looking at while also taking up the nook space and giving you much needed surplus infinite on the desk as well .
Well , there you have it . That is how we were able-bodied to ramp up an inexpensive DIY desk . I really hope it helps you to make the desk you involve on a compressed budget .
But if not , I desire some of the other ideas shared will inspire you as well .
However , I ’d love to hear your thoughts . What are sealed things you absolutely need in a desk ? For me , it was matted work space that want me to detain organized . But do you need drawer space ? Maybe a Murphy desk because you are limited on infinite ?
Was this article helpful?
What went wrong?
This article incorporate incorrect information
This article does not have the data I am await for
How can we improve it?
We appreciate your helpful feedback!
Your answer will be used to meliorate our contentedness . The more feedback you give us , the substantially our pages can be .
