If you bribe an item via data link on this page , we may realize a commission . Our editorial content is not influenced by military commission . Read the full disclosure .
Are you looking for an inexpensive agency to bestow some part to your kitchen ?
I came up with an idea that was inspired by my friend purchasing a new home . She bought an old brick ranch - stylus house .

However , man has she turned this out-of-date home into a showplace ! She had an old brickfireplace she breathednew life into merely by painting it blank .
The station is gorgeous , which led me to consider incorporating white brick into my home .
I have a small kitchen and no way of incorporating veridical brick into my home on my current budget . I did n’t give up , though .

With one trip-up to my hardware storehouse , I work out it out , and the best news program is it does n’t cost much . Talk about budget - well-disposed .
Here ’s how I made my white faux brick backsplash :
You’ll Need:
1. Time to Shop
To make this breathtaking faux brick backsplash , you must maneuver to the depot ( or snitch online ) . Whatever your preference may be , but wherever you ’re shop do n’t be afraid of the particleboard .
There was a clock time where the particle board was as apparent as it could be , but those days are run .
you may now buy particle control panel which looks like brick , pallet wood , and much more . I choose the brick one because this was the look I desire .

However , if you find some other pretty atom board theme , you may desire to give them a go too . ensure you have the blackboard paint , paintbrushes , and necessary tools before you commence .
When you have all your tools , it ’s meter to get to work ! Also , be sure to value your backsplash area first . If you have a little kitchen ( like me ) , you may only need one piece of particleboard .
If you have a larger arena to cover , it may require more . Therefore , be trusted to measure before you buy it .
2. Measure and Cut
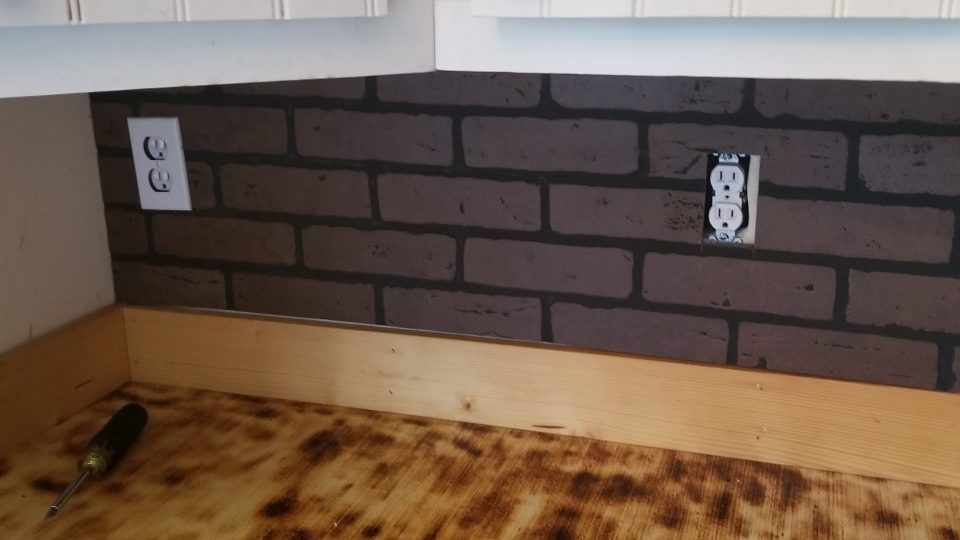
This is the most difficult part of the creative process : measuring . You must measure each department of your wall very accurately . I recommend only cutting one plane section of wall at a time .
After you ’ve measured the first division , measure , and tag where each electrical way out or light switch should go .
Take these measurements to the cut board and cut the enceinte margin of the particleboard first . Once the board is cut , mark your measure for switches and outlets .
You ’ll utilize your circular saw to cut back the large chunks of particleboard , but the Sawzall to cut out each section for the outlets and substitution .
If you ’re want to move your light switches or outlets now is the perfect time to do this . The faux brick backsplash will cover any old holes in the walls , and you could make new kettle of fish for where you ’d wish to move them .
3. Put in Place Temporarily
My married man is a whiz at measure and cutting things . While I ’m someone who struggles cut things absolutely the first time .
Which is why I recommend equip a man of the backsplash temporarily . you’re able to put the paries plates over an electrical outlet to hold the plank in place temporarily .
Now you may see if you need to make any more cut . If you have windows where you ’re total the backsplash , you must switch off around the notch of the windowsill to make the backsplash fit absolutely .
Anywhere your backsplash is n’t fitting well , mark where you should make modification to the backsplash with a pencil and make little cuts .
Remember , you may make more small cuts , but once you make a cut too large , it ’s surd to repair it .
Once everything is sitting on the wall in a way that meet you , pat yourself on the back . The hard part is over !
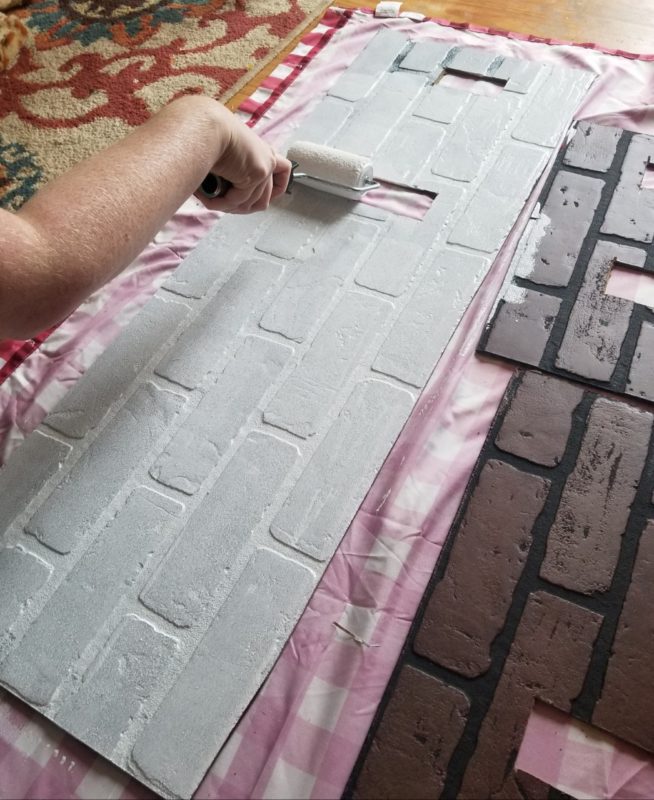
4. Paint and Wait
Painting is my favorite part of the process . I bask painting unproblematic particular , and you do n’t get much simpler than this projection .
Before painting , apply a wry cloth to wipe off any sawdust which may still be on the particle control panel from the cutting process .
After I bed everything was neat , I laid each piece of weakened particle board on an old shower mantle . I used a small roller to give the paint to each part of particleboard .
Make trusted after you hold the paint to the part of subatomic particle board , you check for roller marks before impress to the next one .
After all of the part of particle board have been painted , go back over them again with a 2d coat . I preferred a rustic look which is why I chose chalkboard blusher .
The particleboard will douse up some of the paint which is why it ’s crucial to verify you get the creases where the board tends to be darker .
Also , do n’t await the board to be wholly clean .
If you desire a pristine snowy imitation brick backsplash , you may prefer to go with white latex paint . I ’m slaked with the way my backsplash turn out which makes this all a matter of preference .
Once all the piece of particle card are painted , await for them to dry fully .
5. Lock the Faux Brick Backsplash in Place
After each piece of particle board is dry out thoroughly , it ’s time to put the backsplash up for good . Use screws and an impact number one wood to secure each piece of the board on the paries .
If you have crevice between the board , you may go over them with caulk . In short , do n’t panic if it does n’t look perfect when first put up .
When each art object of dining table is attach securely to the wall , put each faceplate over the easy switches and electrical outlets .
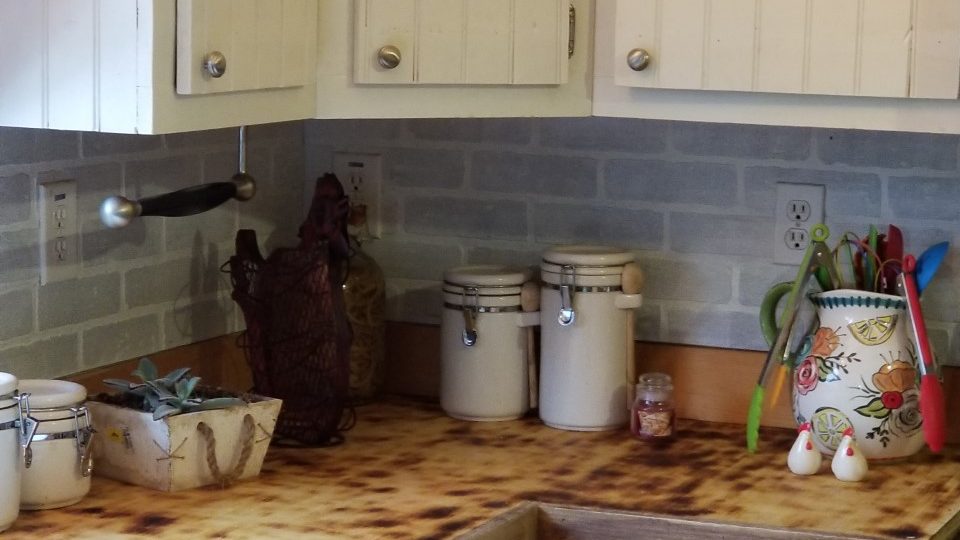
To end up , look for any cracks in your backsplash and apply caulk to seal off everything up . Put everything back on your counter , and you ’re quick to enjoy life in your new kitchen !
This fake brick backsplash project was unsubdivided and an cheap way of life to breathe new life into an old or dated kitchen . My kitchen has been awork in progressfor the past few months , but little by petty it ’s becoming more of what I ’m hop for in my culinary workspace .
I hope you ’ll enjoy this small project which will help transform your kitchen in a openhanded way of life . It ’s great for tight budget and those with introductory DIY skills .
Remember , if you ’re unexampled to DIY and become frustrated , do n’t be afraid to squall for help . You ’re learning young skills that can be carried over to transform a form of space in your rest home . Happy DIYing from one DIY addict to another .
Was this article helpful?
What went wrong?
This article contains wrong entropy
This article does not have the information I am looking for
How can we improve it?
We appreciate your helpful feedback!
Your result will be used to amend our depicted object . The more feedback you give us , the well our pages can be .
