It was a steamy summer Clarence Day when we first set pes onto our homestead .
At the clock time , it was a piece of overgrown land with a double - encompassing trailer on it that was hold uninhabitable . We obtain a killer deal on it and just like that we put our money down and purchased our succeeding homestead .
However , the house had no floors , only sub - floors . It wreaked of wienerwurst urine and it was super outdated and had been forestall on twice .
fundamentally , it take a pot of workplace . However , we did n’t want to spend more than a thousand sawhorse . So today I ’m going to partake in with you how we make awesome floors in our kitchen for a little over $ 100 .
Here we go …
What You’ll Need
1. Get the Idea
You might be wondering why we decided to create our own storey . Well , truthfully , we were on a budget ( as always ) , and weneededanew kitchen .
We go to our local home improvement store and imagine we would just purchase some qualitylaminate floor . We did lay cheap laminate floors when we first moved in , but they crack very easy .
When we appraise our kitchen and compare it to the price of laminate flooring , we soon realized we would be spending almost $ 600 just on the flooring . That did n’t include the cushioning that run underneath .
So this was a Brobdingnagian issue as we only had a $ 1,000 budget ! Well , we went to Pinterest and started bet for DIY floors and that is where the idea of hick farm floors make out about . There were some videos and article on how to do these a small other than than we did but I sense like our method lick dandy . Not only that but it was also efficient , and cost - effective .
2. Measure and Buy
Next , you need tomeasure the spacewhere you want to apply the wood floor . For us , the measurement were 15 x 8 - feet . Once we had our measure in script , we get to our local home advance memory board and purchased already sanded plywood .
you’re able to buy the cheaper option which is the rough cut plywood . It is about half the price but does require a bunch more sanding . My aged female parent - in - law lived with us at the time so we had to be quick and get our house back together .
The already sand plywood suit us better . However , this is entirely up to you and your budget .
You also need to purchase anail gunas it makes your living a lot easier . However , before getting one ( especially if you ’ve never used one before ) make certain you are knowledgeable about thesafety precautions .
Also , buy the appropriate nails needed for the projection . One large number should do the antic as it does n’t take many nails to nail the boards down securely .
You ’ll alsoneed a sanderand agood table sawif you do n’t have them already . We were golden enough that we already had all of the necessary shaft on hand .
3. Cut Your Plywood
Here ’s a decent video on how to break down plywood :
I have heard that certain home improvement store will really cut your plyboard to the right size of it for you .
However , our local computer storage did n’t do it for us . We had to go home and cut down it ourselves . If your local store is just like ours then you ’ll have to cut the board yourself . coiffure up your mesa discover and cut your boards to 6 - column inch by 48 - inch long . The trick to this step is to strain and slue your boards as straight as possible .
It will make put them much easier . However , if by some chance you do n’t get them perfectly straight do n’t panic , you could still get them to work on .
My hubby and I made this undertaking a 2 - person procedure . He would feed the boards into the table saw , and I would help guide them off of the mesa see and pile them .
And that is all there is to it . You will have your trading floor at this item .
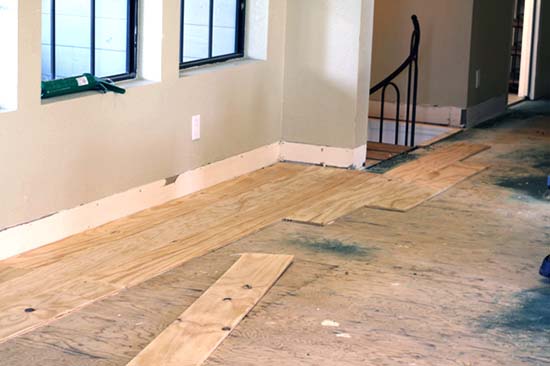
4. Lay Your Floor
You will lay this floor just like you would any other laminate style flooring . You will start laying one row of boards and run all the agency to the final stage of the outer space . And then start on the next row .
However , this is where our method differs from a lot of the other farmhouse floor . Some people place a coin in between each panel . This throw it a little act of a more rustic aspect .
Even so , we did not do this for two reasons . First , this would have bestow one more whole tone in our DIY process and we just did n’t wish it enough to take that additional step .
Second , undesirable gunk can easily be catch in those cracking . I personally did not want the challenge of having to clean the gunk out of those cracks . However , you know gunk is probably inevitable in the kitchen .
If you are placing these floor in a room where they might be less probable to catch all of the unwanted poop and gunk in them then you might want to consider placing the spaces between boards .
For us it was n’t the right choice . So it ’s up to you .
5. Sand the Floors
The next step is rather ego - explanatory . You will take your sander ( even if you purchase the sanded plywood ) and go over it . Unfortunately , you will find this stone’s throw on your back . I ’m actually the one who did this part of the project because I ’m short . I also did it bare - footed .
That way when I was finish sanding an area I could rub my foot over it and see if it was smooth enough to take the air on without socks or shoes .
If not , then I ’d go over it some more . You ’ll just keep repeating this process over the whole story until it is sanded to your preference .
6. Clean Them Up
Now , you ’ll clean up the floor . Be certain to go over them with a good broom , vacuity cleanser , or buy at vac because you want to get as much of the debris up as possible so when you apply the discolouration to the floor nothing will show .
We did this by using our shop vac . I did n’t include it in the tools call for list because this can be carry through with a broom or with agood void cleanser .
Be certain to walk on the floors with au naturel foundation again so you ’ll be able-bodied to feel how clean they actually are .
7. Stain Them
This next measure is very wide-eyed and give the floor a finished face . Once your floor are sanded and cleaned it will be clock time to add some discoloration .
you’re able to add a wide-eyed coat of polyurethan which will bequeath the floor the lighter color of the plyboard but will still give the floors needed protective covering from liquids descend on them . Or , you could also supply a darker stain if you desire a deeper look .
We actually chose towhitewash our floors . rent me tell you why : it gives our kitchen a hick , country magical spell that I really hope when we remodeled it .
Yet the good part of having whitewash kitchen floors is that they are really great at disguising the dirt . When I sweep up my level , I ’m stunned at how clean they expect yet I get up a lot of crap .
Now is probably a good sentence to request that you do n’t pass judgment me for have dirty floors . I have children and a husband that do n’t believe in wiping their feet before entering the household .
Fortunately , the floors glisten when you mop them because your floor ( that never looked muddy , to begin with ) are bright and bloodless like raw again . So needless to say I absolutely love and do n’t regret my choice of whitewashing .
You still postulate to make love how to give the stigma , though . We in reality added a broom handle to a roller brushing . Then we paint our floors like you would your kitchen walls . Just seek to apply it as evenly as possible .
Also , be sure to give your floors metre to dry out . Then add another coat of paint to the floors . Once you are proud of with the color then you may quit covering them .
Now you are quick to bask your floors .
How to Clean and Repair Your Floors
The good part about these floors is that they do n’t require anything particular to clean them . You will need a heavy old fashioned mop and some raging , oily water . Then you ’ll just wring your mop out from the soapy pee and go over the flooring .
If you have some filthy spots that are stubborn to remove , add a little pressing and they should go away rather easily .
If by some luck something happens to your floors , you do n’t have to take up the whole floor . You will simply cut another add-in to size and draw up the sorry display panel or plank and replace them like you did when you put the floors down .
It does n’t get any easier to scavenge or repair any floor than that .
Well , there you have it ! We actually put these floors down in our kitchen for a niggling over $ 100 .
So hopefully this will give you an idea of how to redo your homestead house on a budget .
Was this article helpful?
What went wrong?
This clause contain wrong entropy
This article does not have the entropy I am depend for
How can we improve it?
We appreciate your helpful feedback!
Your answer will be used to meliorate our subject matter . The more feedback you give us , the well our page can be .
