Are you looking for an inexpensivegarden shed ?
Well , you may commend when I share how I built a garden shed on our first homestead for essentially no money . Yes , we build ashed for free !
Now that we ’ve moved to a large homestead , I cerebrate we ’d get a little fancy . This time we up our budget to a humongous $ 3 .

Yes , I sleep with , we splurged . However , we got a great garden shed build that should last us for many years to derive . Does this sound like something you ’d be interested in ?
Well , if so , then you ’ll desire to keep reading so I can divvy up with you exactly how we build our inexpensive garden shed .
How to Build a Cheap Garden Shed
You will need :
1. Collect Your Pallets and Other Free Material
You ’ll want to get the process by gathering your textile . Some of the materials you may have to purchase like screws or nails . If you do n’t have wood , then you may have to buy that too .
However , we had scrap wood lie around that someone had given us from a while ago . We had the nails and screws .
However , if you do n’t have these token , you could take apart another old project that you no longer use that is made of wood . We have done this in the past with an old wooden walkway to make the loft bed in ourgoat shed .
Plus , you could endeavor to salvage any old nails or screws from this project as well in rescript to save yourself some money on fabric .
Then you ’ll require to gather some metal . We were fortunate in this area too ( this is really why we create a alloy construction . ) The property we moved to had some bit pieces of metallic element that had been tossed out into the Ellen Price Wood . We looked over the prop to see what ( if any ) stuff were left hang around .
by nature , we come across this heavy stack of old metal and knew that we had to put it to use . Apparently , it was tossed there after they built an old chicken henhouse .
Now , if you do n’t have metal , you could always do what we did with our first garden shed , which is trying to collect slabs . Most sawmills will either give them away or deal them for very fiddling money . If worse comes to worst , you could always mill your own Sir Henry Wood from tree diagram on your property so you have siding for your shed .
Finally , you ’ll want to locate the palette . I love working with pallets because they are durable and usually barren to get . If you could locate a small business concern that arrest particular ship to them , then you ’ll likely be able-bodied to settle pallet for free .
The larger companies normally charge you to take them ( if they let you have them at all . ) Still , smaller businesses are commonly thankful for you wanting them because it saves them from ingest to make up to have them reuse .

Ideas on where you could locate pallet are usually places like local garden nurseries , local grocery stores or bring about outdoor stage , or mom and pop supplying stores .
Once you have your materials meet you are quick to start your build .
2. Lay the Foundation
Now that you have materials to make with , you may begin build by laying your foundation . This is really very comfortable to do .
You ’ll need to pick the location for your shed . I recommend it being a place that is out of the way of life , yet commodious enough for you to access when work in the thousand or in your garden .
For me , I chose to localise our garden shed at an angle close to thepole barnand near the garden . That way it is closelipped enough to the garden , but still out of the agency where we move around frequently with the tractor , lawnmower , or golf pushcart when haul veg .

Next , you need to be sure that the earth is level enough in that location to build on . If not , then you ’ll have to dig it out to make it level or place concrete blocks under it to make it level . Our post was level so we did n’t have to do this .
Even so , I did have to do these step when building ourchicken henhouse .
So if you run across this trouble in your fix , just keep at it . I know leveling thing up can be frustrating at time , but you ’ll get it where you need it eventually .

lastly , when you get hold the perfect spot that you feel will be level enough , then you need to lay your 4 pallets two-dimensional in a large lame .
Now , I should mention , if this is too bounteous of a shed for you , then take out 2 of the pallets . If you ’d like a large shed , then tote up more pallets . That is the beauty of this garden shed because it is so well-to-do to modify to fit your needs .
3. Add the Floor
Now that you ’ve place your pallets on the ground , it is metre to impart the storey . This is what really cost us $ 3 . We purchased 2 sheets of plyboard to employ as the floor . This cost us $ 3 to do .
If you have another material on hand that will work and not cost you a dime bag , I say go for it . The less money in a project , the better in my opinion .
Then you ’ll lay it over the pallets . You will plausibly have to dress the plyboard down to suit the area , but this will depend upon the size of it of the plyboard that you purchased .
When you have the plyboard cut down to size and placed how you want it on the pallets , then you ’ll use your shock or hammer and screw to hammer the plyboard into place . This will be the base of your garden shed .
Now , what I really love about this as dump is that it should last for quite some time . Most plywood or composite board is termite resistant . The only thing that will eventually get to it is moisture , but plywood normally holds up pretty well to that as well .
However , if that concerns you , you could put a pelage of polyurethane over the plyboard to protect it from the elements , or simply paint it . I ’m not passing interested about the wear and tear of this garden shed at the moment , so I just left it as is .
4. Frame Up the Walls and Roof
Now that you have the foundation and the storey , you are ready to border up the sides of the garden shed and the roof .
You ’ll get by measuring the distance of the side of the garden shed . It will be the length of your 2 pallets put together . This will vary depend on the size of your pallets , so you ’ll have to measure for exact measurements .
Once you have those measurements , then you ’ll require to skip a 2×4 to length . Then you ’ll consist the 2×4 on its side so the skinny part of the display board is what is support it , and then nail it into home .
Then you ’ll repeat the process on the other side .
Next , you ’ll need to make up one’s mind how tall you ’d like your shed . Then you ’ll bring the next ( 2 ) 2×4 ’s per side to befit that height . You ’ll stick out them vertically on the display panel that you just nailed into place on the pallet / plywood base and nail it into piazza . You ’ll do this on both side . This will digest your walls .
Finally , you ’ll use ( 4 ) 2×4 ’s slash to duration to connect the 2×4 ’s that are frame up the wall . This will create a rectangle and will be the get down support of your roof .
Then you ’ll trim 2×4 ’s to length to serve as a support for the roofing material . They will run vertically to hold up the roofing material . You could apply pocket-sized pieces of woodwind here if you prefer or have them on bridge player as well .
Once you ’ve got your garden shed frame of reference up , you are ready to move on to the next steps .
5. Add the Siding and Roof
This is the dangerous part of the building but also in all likelihood one of the most square forward-moving steps . If you are ferment with alloy , then you ’ll need to be very cautious with this footstep because as we all know metal is penetrative and cut very well . I recommend usingwork glove .
Then you ’ll disregard your piece of metal so they are the breadth of the side of your garden shed . Once they are , then you ’ll use screw or a cock and nail to lay the sheets of alloy onto the side of the garden shed .
Once the 2 sides and the back of the garden shed are complete , you ’ll cut the weather sheet of metal to the duration of the roof .
Then you ’ll sleep with or nail them into place on the supports . Be sure to overlap the material so that it is secure and finish water from run into your garden shed .
Now , if you want to add a front or a door on your shed , then you ’d just ask to draw up it up like you did the other side of the shed and add the metal as sidetrack .
Then you ’d have to create a door frame and either build or purchase a door to use as a room access on your shed . Our neighbor are all really well-disposed , and we look out for each other so I do n’t really eat into about lock up my garden tools .
Even so , I recognize that is n’t the example for everyone , so you ’d just have to modify the shed to have a doorway if you need one .
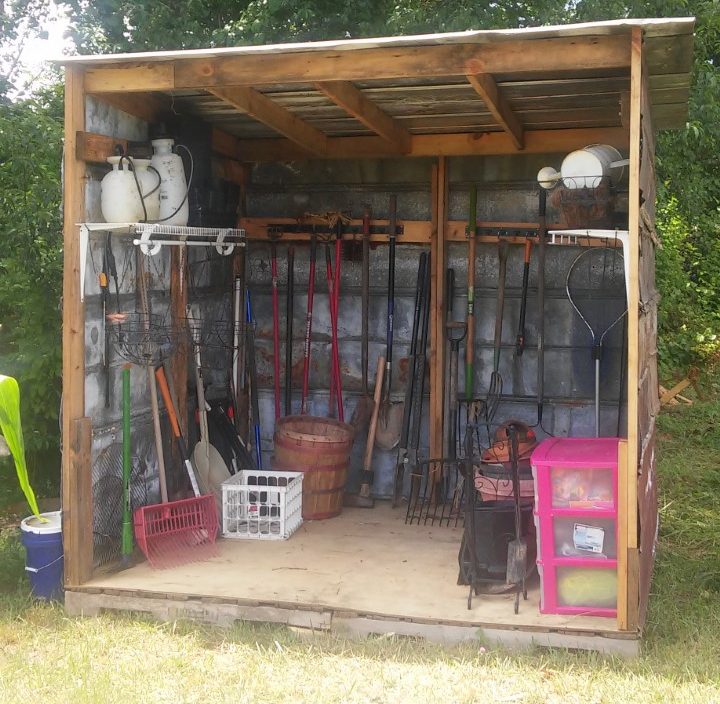
6. Organize Your New Shed
You ’ll complete this shed by coordinate it . We had some old telegram shelf that used to hang in our basement , that we took down and placed them in the shed to accommodate items .
Then we used an organisational detail that we once used in our garage . It works really well to hold your garden hoe , shovel , etc .
However , if you do n’t have these items on hand , you could actually build your own organisational items . You could cut pieces of wood to size and then get it on 2 of those pieces together to make a ledge .
Then you ’d create a shelf wall bracket to direct it on the paries . You could also put nails or screws in the wall of the shed at an slant to hold your gardening tool as well . This is an inexpensive path to direct your tools in your garden shed .
That summarise up how we progress our $ 3 garden shed . I desire it facilitate you to work up something of your own for very little money , or maybe you could hearten what we built .
Was this article helpful?
What went wrong?
This article contains incorrect information
This clause does not have the information I am reckon for
How can we improve it?
We appreciate your helpful feedback!
Your answer will be used to improve our contentedness . The more feedback you give us , the easily our pages can be .
